Windows Management Instrumentation (WMI) Provider Host High CPU Usage – Has it ever occurred to you that your CPU resources are being in use even if your Windows PC is left idle? This could be due to the background processes that are essential for carrying out some common system functions. One such process is the WMI Provider Host (WmiPrvSE.exe). These processes are only meant to take a fraction of your resources and shouldn’t hog all of it. However, in some cases, there is a fair chance of finding the Windows Management Instrumentation (WMI) Provider Host high CPU usage. This is definitely a thing to worry about. If you are one among the sufferers, you are at the right spot.
Now that you have figured that the WMI Provider Host is the actual culprit, one of these questions might already have popped in your head – What is WMI Provider Host? Can I stop Windows Management Instrumentation (WMI) Provider Host or How do I remove WMI Provider Host? You’ve got questions – we’ve got answers. Let’s roll in!

What is WMI Provider Host (WmiPrvSE.exe)?
WMI is an acronym for ‘Windows Management Instrumentation’, which is an essential component of the Windows Operating System aimed at providing management data to other components of the System. In simple words, many parts of the system are dependent on the information provided by the WMI Provider Host (WmiPrvSE.exe) for their proper functioning.
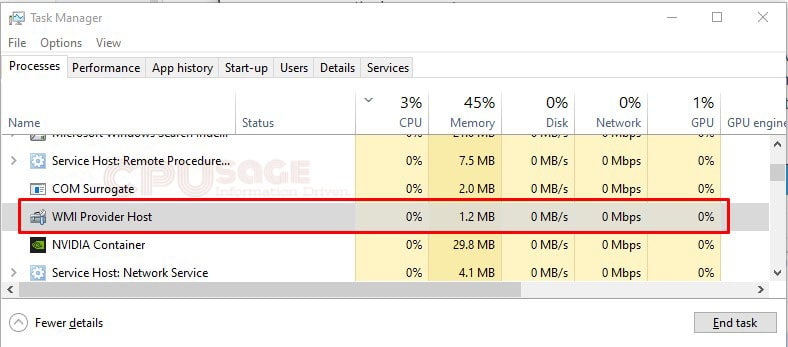
Apart from this, WMI also helps in the smoother execution of the software and administrative scripts by providing them with information like the state of the windows operating system and crucial data relating to it. This is very essential especially in the case of remote management of computers.
This brings you to the next big question.
How do I remove WMI Provider Host?
Removing the WMI Provider Host isn’t technically possible as most programs are dependent on this service for their proper functioning. Stopping which will cause great instability in the system components and may end up crashing your Operating System. It is highly advised that you should never try stopping or removing the Windows Management Instrumentation (WMI) Provider Host (WmiPrvSE.exe).
Why is WMI Provider Host using so much CPU?
WMI Provider Host isn’t meant to run all the time. Its only job is to stay idle and respond when another piece of software or a script requests information via WMI. Technically, it shouldn’t consume your CPU power as long it stays idle. It might occasionally use some CPU resources to respond to a request and this usage should only last a while. Prolonged high CPU usage is a sign that something is terribly wrong as the WMI Provider Host shouldn’t use lots of CPU resources all the time.
The reason can be anything, the process itself might have stuck in a bad state or there must be a problem with another service that kept on engaging the WmiPrvSE.exe service or it can also be a malicious program that kept the WMI Provider Host in the loop.
Whichever the reason can be, we have figured out a few simple fixes to help you get rid of WMI Provider Host high CPU usage problem on your Windows PC.
How to Fix WMI Provider Host high CPU usage issue in Windows 10?
Wasting your system resources on useless background activities can be annoying as they keep slowing down your computer and might even cause it to freeze often. We at CPUsage have committed to easing your annoyance by figuring out a few working fixes to this issue.
Fix 1: Restarting the WMI Provider Host service on Windows 10
Restarting your Windows Management Instrumentation service (WMI) might sound a bit cliche but trust me this should do the job in most cases. There is a fair chance that your service is stuck in a bad state and a simple restart should fix it like a charm. However, you don’t need to restart the entire computer but the service itself.
To do this, open the service management console on your computer. You can achieve this in two ways.
Method 1:
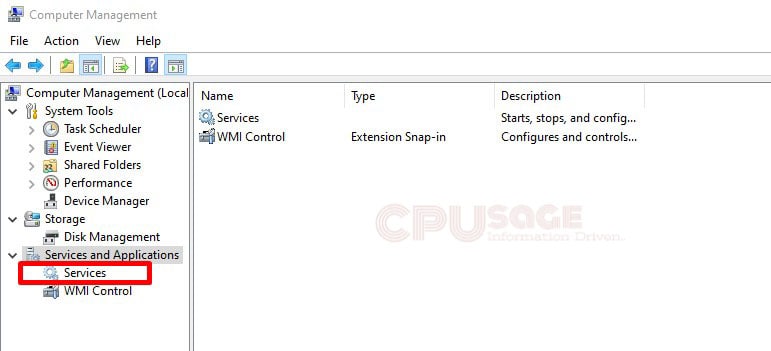
Right-click on the My Computer/This PC icon and choose Manage from the list. This should bring up a new window. Now click on the Services and Applications option on the left pane and choose Services from the displayed options. This should open the service management console.
Method 2:
Open start menu and type ‘Services.msc’ and hit enter. This should directly open the service management console.
Once you are on the Service list window, scroll down to find a service with the name ‘Windows Management Instrumentation Service’. On finding it, right-click on the service and choose the ‘Restart’ option.
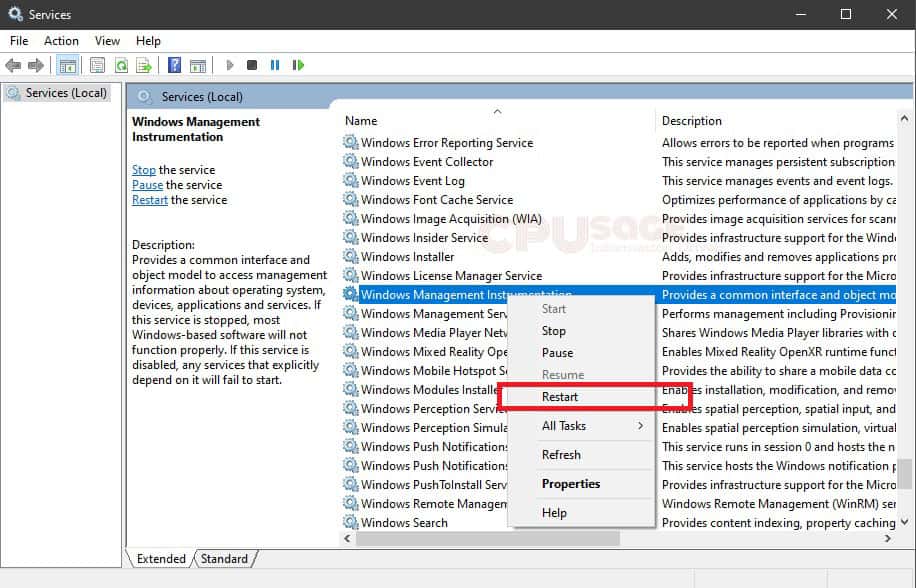
This should restart your WMI service. Check if this helped. In most cases, this should fix the WMI Provider Host High CPU usage issue. If it didn’t, try the other possibilities that we are going to list down.
FIX 2: Identifying the process causing the problem with WMI on Windows 10 computer –
If restarting the WMI Service didn’t help, understand that the problem is with another process that is continuously sending requests to the WMI Provider Host (WmiPrvSE.exe) service, keeping it busy which ultimately hogs up a lot of CPU resources. Identifying that particular program or service and either disabling it or uninstalling it should fix the problem.
If you are on Windows 8 or 10, you can directly right-click on the Start button and choose ‘Event Viewer’ from the list. However, Windows 7 users can still access the Event viewer by typing in ‘Eventvwr.msc’ in the start menu and click on the suggested application to launch it.
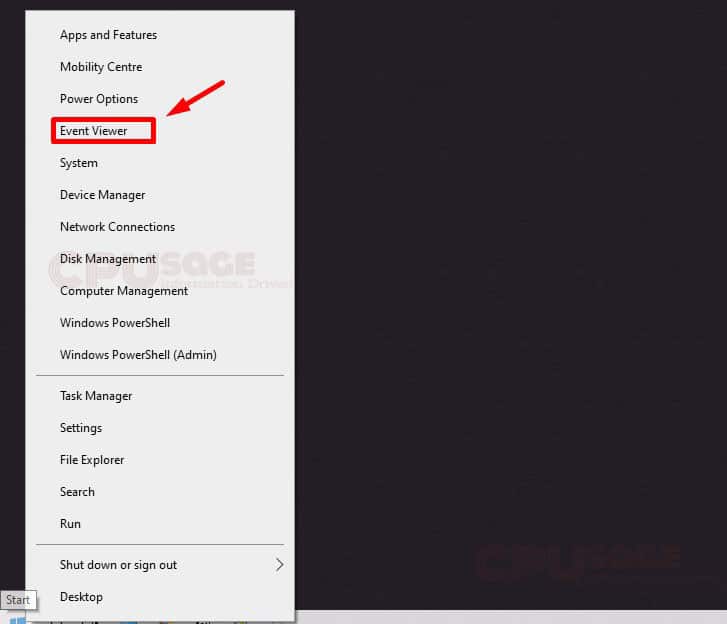
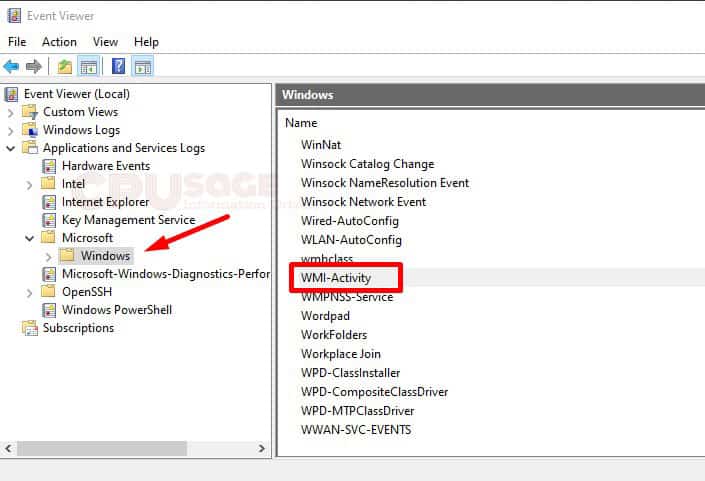
Once you have the ‘Event Viewer’ opened, in the left pane of the window, navigate to Applications and Service Logs\Microsoft\Windows and click on the WMI-Activity option as seen in the image below.
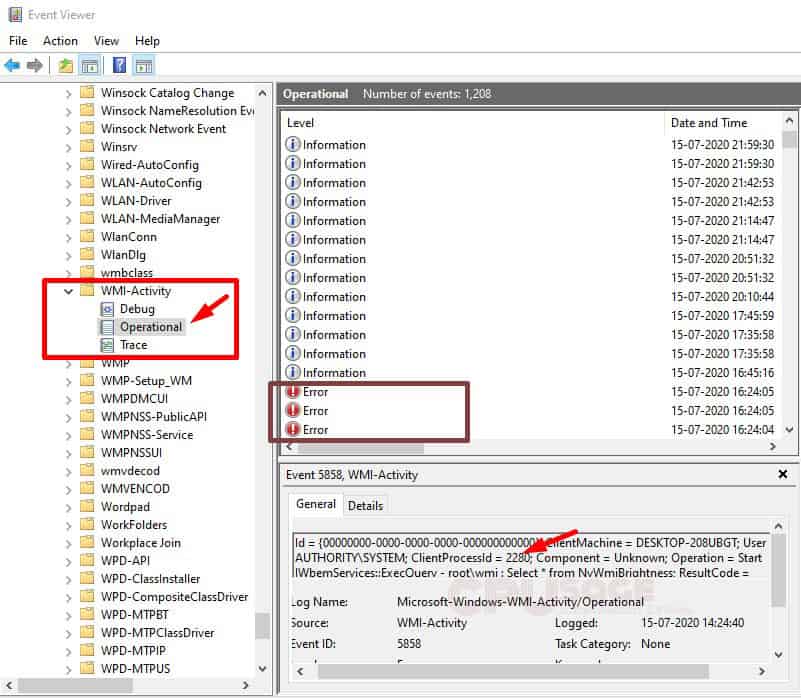
Once you click on the WMI-Activity, choose ‘Operational’. This should display the WMI-Activity events. Now check for the recent activity with errors and note down the ID number of the process that caused the WMI error. There is a high chance that you see more errors. Note down the process IDs for each error.
Now that you know the process IDs of the processes that are causing the errors, you can proceed with terminating those processes one after the other to see if that fixes your issue. To do this, head over to Task Manager. You can open the task manager either by right-clicking on the taskbar and selecting Task Manager from the list or use the keyboard shortcut Ctrl+Shift+Esc.
In my case, the ClientProcessID causing WMI operational error is 2280. Now search the Task Manager for the same.
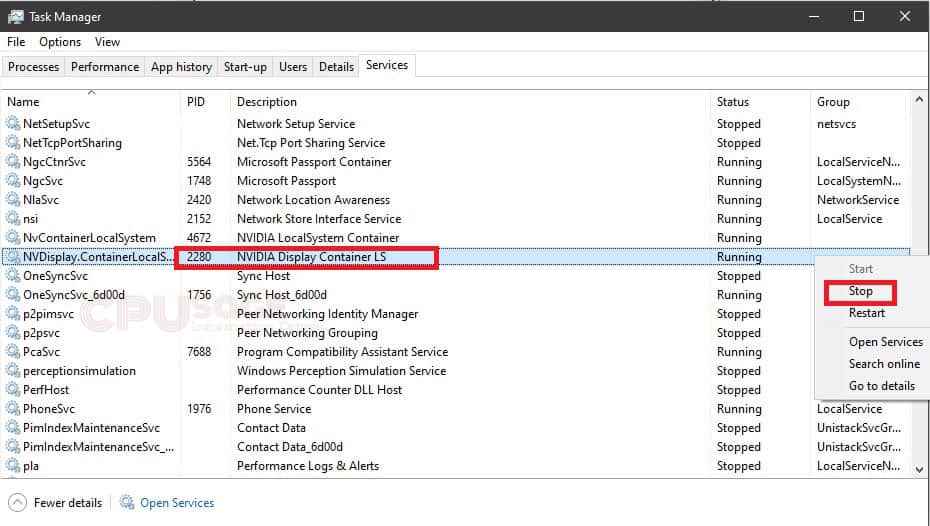
In my case, ‘NVIDIA Display Container LS’ is causing the error. I can go ahead and terminate the service by right-clicking on it and selecting the stop option.
This should fix the wmiprvse.exe WMI Provider Host high CPU usage problem on my Windows 10 computer.
FIX 3: Boot into safe mode with Networking –
If the above two fixes didn’t work for you, try booting your Windows computer into safe mode with networking enabled. What it technically does is, in safe mode the essential services required to run the system software are only permitted to run leaving behind all other services related to the application software on your computer. If one of the services related to the programs you have installed is causing the trouble, you will get to know it in this stage.
How to boot your Windows 10 PC into safe mode with networking?
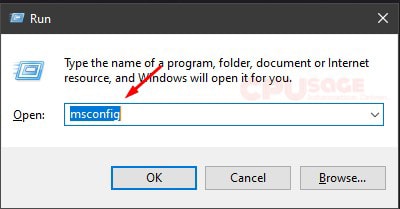
1. Use the keyboard shortcut Windows Key + R to open the Run command box. Once your run command box pops up, type msconfig in the search box and hit enter key on your keyboard.
2. Doing the 1st step should bring the System Configuration window on the screen. Now click on the Boot tab present at the top of the window and then check the box for Safe boot. Also, make sure to highlight the network option below the Safe boot option. Now click on Apply and then click OK to save the changes to your configuration.
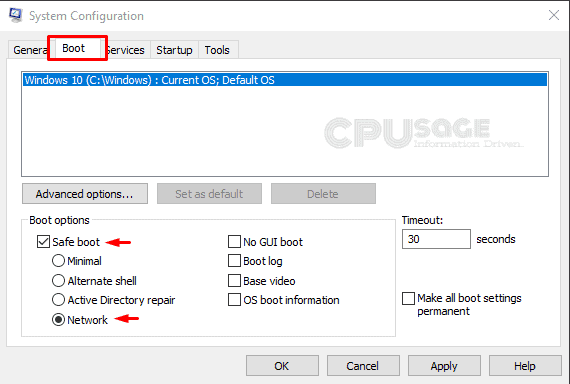
3. Once you are done applying the above changes, you should see another dialog box asking you to restart your computer in order to apply the changes. Click on the Restart button in the appeared dialog box. After making changes, even if the dialog didn’t appear, do not worry. You can take the privilege of restarting your system manually. Either way, it is important to restart your Windows 10 computer after changing the boot configuration.
4. After the reboot, your Windows should start in Safe Mode. Once you are in the safe mode, press Windows Key + X on your keyboard and select Windows PowerShell (Admin) from the menu.
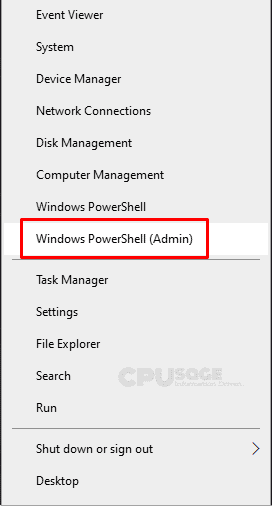
5. Once your PowerShell window opens up, type the following command and press enter.
msdt.exe -id MaintenanceDiagnosticUpon entering the command, you should now see a window pop up to help you troubleshoot your computer for possible problems. Click on the Next button on the troubleshooter window to proceed with detecting if there are any potential problems.
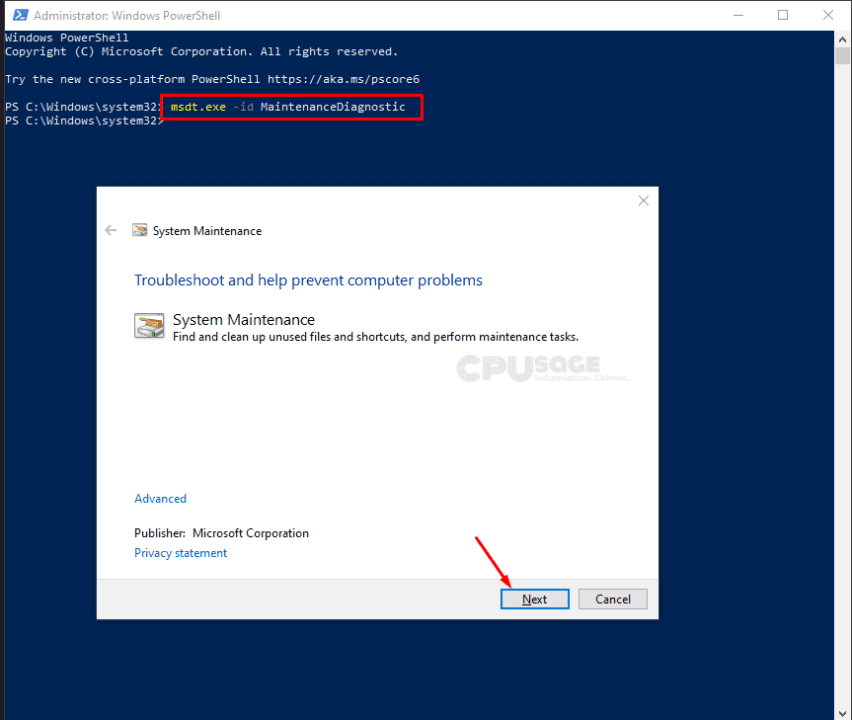
If there is any issue in this session, the troubleshooter will alert you and will do the needful to repair the same. If there isn’t any problem detected in this case, proceed to the next step.
6. Now in the PowerShell window (if there is no active PowerShell window, open it by redoing step 4), type the following command and press enter.
msdt.exe /id PerformanceDiagnosticYou should now see another window popping up. This should fix all the problems related to speed and performance and optimize your windows better. Click on the Next button to proceed with diagnostics.
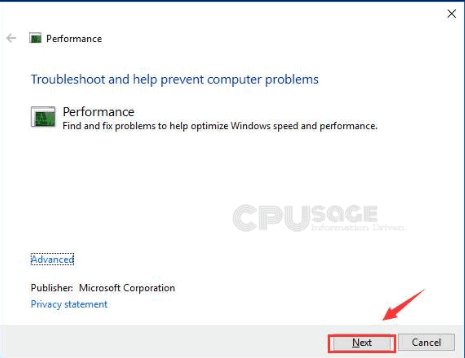
It alerts you if there is anything that requires you to change manually. Do as it instructs you.
7. Doing the above should fix your WMI Provider Host high CPU usage issue in Windows 10. Now, to exit safe boot and boot into normal mode, redo 1st step and uncheck safe boot in the Boot tab and click on the Apply and then OK button and reboot your computer.
How to Fix WMI Provider Host high Process usage issue in Windows Server 2008, 2011, 2012, 2016, 2019?
If you are on any of the Windows Server Operating Systems from Windows 2008, 2011, 2012, 2016 to 2019 and are experiencing the WMI Provider Host high CPU usage, the fixing process should technically be the same as that of the Windows 10 version.
Feel free to comment down, if you lost somewhere. One of our team members should get to assist you in a short time.
Also Read This FIX:
Fix WSAPPX high disk use and high CPU usage error.
system interrupts high CPU
FAQs About WMI Provider host High processor utilization Around the web
Windows Management Instrumentation (WMI) Provider Host is an essential windows functional service that provides system information to other programs and services. Stopping the WMI Provider Host will result in system instability. It is recommended not to terminate the WMI Provider Host.
WMI Provider Host is one of the components of the Windows Operating System aimed at providing management data to other components. In simple words, many parts of the Operating System are dependent on the information provided by the WMI Provider Host for their proper functioning.
WmiPrvSE is a component of the Windows Management Instrumentation provider aimed at providing management data to other programs and services of the operating system.