Before getting to the wsappx high CPU use issue, let us first understand how the OS works. The Operating System is a cluster of many individual software components that are put together to function as a whole. Each individual component will have one or more processes running in the background. While in some cases, a system component/Application may have to access information from multiple processes/services for its proper functioning. One such process is the “wsappx”.
The wsappx process is found in Windows 8 and 10, which is associated with the Windows Store and can be seen running in the background while using a significant amount of CPU and disk resources.

What is wsappx?
The wsappx is a process related to Windows Store running on both Windows 8 and 10. Wsappx includes two separate background services where the AppX Deployment Service (AppXSVC) is common for both Windows 8 and 10. The Client License Service (ClipSVC) on the other hand is a Windows 10 exclusive while Windows Store Service (WSService) can be seen on Windows 8 alone
Each time you open the Windows Store application, you should have the wsappx process running in the background. Open the task manager to find the wsappx in the processes list. Expanding it will show you one or both the sub-services (depending on your operating system) of the wsappx. These services essentially handle the installation, removal, and also help in updating the Microsoft Store Apps while ensuring their proper licensing.
Now that we have found the answer to “what is wsappx”, let us also know what causes wsappx high CPU usage. But before that, let us learn about the sub-services of the wsappx process.
What is AppX Deployment Service (AppXSVC)?
As the name indicates, the AppX Deployment Service is used to deploy Store Apps. AppX refers to the extension of Windows Platform app packages. Essentially, the AppX Deployment Service (AppXSVC) helps in installing, uninstalling, and updating Store apps. The service is usually started by the Microsoft Store as the automatic updates are turned on by default. So, technically, Windows will update store applications in the background automatically and this isn’t possible without the AppX Deployment Service.
Besides using the Processor resources, the AppX Deployment Service (AppXSVC) also uses the disk resources in order to install, remove, or update the Windows apps from the store. Similar to installation from the Windows Store, the traditional desktop application installation process also uses resources. But in the case of installation from the Windows Store, the resources are used by AppXSVC while in the case of traditional installation, the program’s installer uses the resources.
| Display Name | AppX Deployment Service (AppXSVC) |
| Name of the service | AppXSvc |
| Path | %WinDir%\system32\svchost.exe -k wsappx -p |
| File | %WinDir%\system32\appxdeploymentserver.dll |
| Object | LocalSystem |
However, in some cases, you will find this service running on your computer even if you are not using the Windows Store application. This is because Windows is updating your Store Apps in the background. This is why you sometimes get to see this process running in the background while consuming your CPU and Disk resources.
What is Client License Service (ClipSVC)?
The Client License Service (ClipSVC) provides infrastructure support for the Microsoft Store. As the name implies, it checks the licenses for the applications that are purchased by the user. Disabling this service will result in the malfunctioning of the applications bought from the Store.
The Client License Service (ClipSVC) is a Windows 10 only service. Besides validating the licenses, it does a number of other things that ensure the proper running of the Store apps. However, Microsoft has not detailed much about the other functionalities of this service.
| Display Name | Client License Service (ClipSVC) |
| Name of the service | ClipSVC |
| Path | %WinDir%\system32\svchost.exe -k wsappx -p |
| File | %WinDir%\System32\ClipSVC.dll |
| Object | LocalSystem |
What is Windows Store Service (WSService)?
The Windows Store Service (WSService) is Windows 8 exclusive and is intended to provide infrastructure support for Windows Store. This is technically the same as the Client License Service (ClipSVC) present in Windows 10. It is just that they are named differently.
Stopping or disabling the Windows Store Service (WSService) will not ensure the proper functioning of Windows Store Apps.
| Display Name | Windows Store Service (WSService) |
| Name of the service | WSService |
| Path | %WinDir%\System32\svchost.exe -k wsappx |
| File | %WinDir%\System32\WSService.dll |
| Object | LocalSystem |
Now that we have learned about wsappx and the services concerning it, let us now understand the cause of wsappx high CPU usage and how to fix it.
What causes wsappx high CPU usage?
In general, the wsappx service uses a noticeable amount of CPU especially when the associated tasks like updating, installing, or uninstalling of Store apps are happening. This can happen as a result of the two – you chose to install or uninstall an app from the Store or the Store itself is automatically updating apps on your system in the background. Either way, the services only use considerable amounts of CPU when the programs associated with them are accomplishing certain jobs.
Can I disable wsappx process on Windows PC?
You cannot technically disable the wsappx process on Windows PC as it is not something that runs forever on your computer. It only starts when it is demanded by the application associated with it and closes itself when the application is closed.
These services are called ‘on-demand’ services as they only run on demand. For example, launching a Store app on your PC will start the ClipSVC service, and launching the Windows Store itself will start the AppXSVC. And if you initiate a fresh Store app install or if you just uninstall an existing app, you should see the AppX utilizing some of your system’s resources to accomplish the assigned task.
If you ever tried killing the wsappx process from the Task Manager while it is running, you should see a warning stating that the system will become unstable or shuts down if you disable the wsappx process. So technically, there is no way that you forcibly shut down the wsappx process running in your Windows PC. Even if you find a way to prevent these processes from running, it is highly recommended not to. Because the wsappx is a critical part of Windows 10 disabling which will cause instability in most other components.
Ideally, they should only run when it is needed and close when there isn’t and use very few system resources. During installing, uninstalling, and updating Store apps, they use little more resources.
However, if you still wish to disable the wsappx process, instead of concentrating on its services, limit or disable the triggers that use wsappx. For instance, turning off automatic updates on the Windows Store or even disabling the Store permanently can help you achieve the point. Read further to know-how.
How to fix wsappx high disk use and high CPU use on windows 8 and 10?
Now that we know the wsappx is an essential component of the windows 10 and 8, it cannot be disabled or removed. However, we can still limit the trigger instances that lead to the usage of the wsappx process. Below are some of the ways through which you can achieve this.
#Fix 1: Disable Automatic Updates on Microsoft Store
Every time an app on the Windows Store is updated, it necessarily runs the AppX Deployment Service (AppXSVC) in the background which ultimately results in the consumption of resources on your system. In order to avoid this, you can opt to turn off auto-updates from the Windows Store. Follow the steps below to get this done.
First, open Microsoft Store on your computer. You can do this by clicking the windows key and typing ‘Microsoft Store’ on your keyboard.
Click on the three dots present on the top right corner of the Store window and choose Settings from the list.

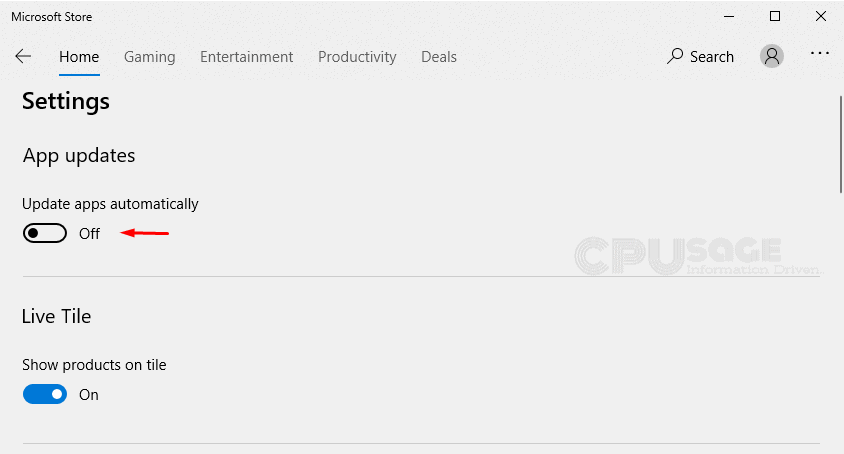
On the settings page, click on the toggle switch representing ‘Update apps automatically’. This should prevent the Apps installed from the Windows Store from automatically updating in the background.
#Fix 2: Disable Windows Store itself
If you are like me who isn’t much into Microsoft Store, you can happily disable Windows store with absolute zero regrets. Once you do that, you will no longer be able to access Windows Store or applications belonging to it. As a result, the wsappx service is no longer going to bother you. If you are up, let me walk you through the process.
You can do this in different ways but my most favorite ways are as follows.
1. Using Local Group Policy Editor to disable Windows Store –
Group Policy is a Windows feature that contains a variety of advanced settings. Using Group Policy Editor, one can tweak some Windows settings that are not normally available from the graphical user interface (GUI).
One cannot directly disable the Windows Store. However, this can be achieved by making some simple changes in the Group Policies using the Group Policy Editor on Windows.
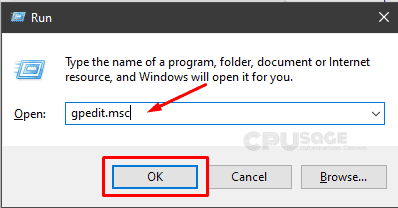
Step 1: Open Run Command Box by pressing Windows Key + R on your keyboard. Now type, gpedit.msc, and click on the OK button.
Note
Some versions of Windows, the Windows 10 Home, for instance, do not come installed with the Local Group Policy Editor. However, you can still install the group policy editor on your machine. I’m not going to discuss it here as this is going to get really big. There are a number of tutorials on the internet. Feel free to use Google.
This should open up the Local Group Policy Editor window.
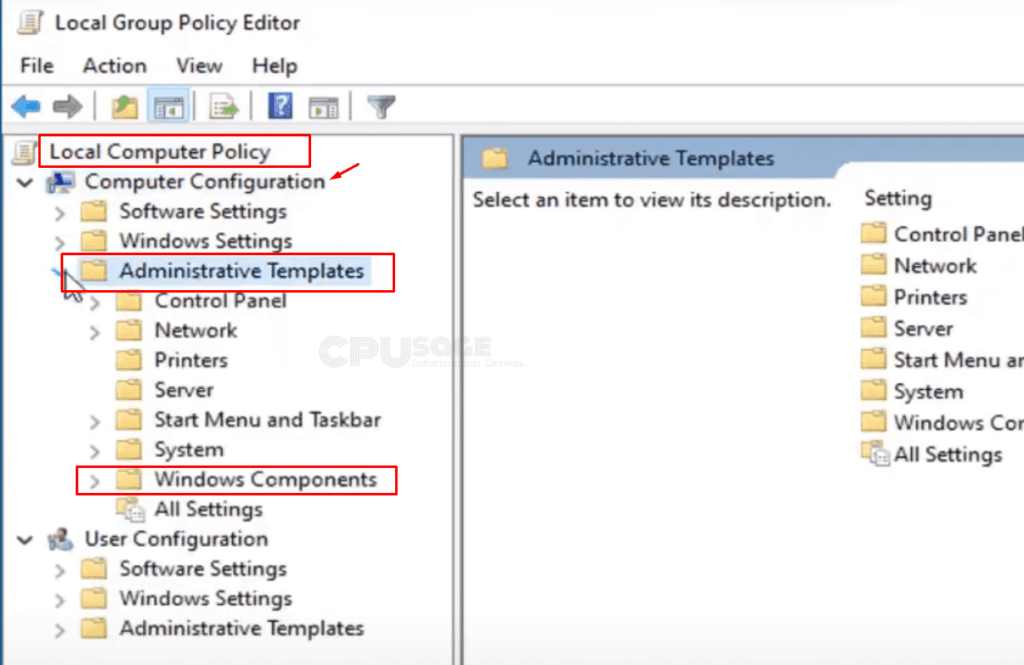
Step 2: In the left pane of the window, choose Local Computer Policy from the list and then select Computer Configuration.
Step 3: Under the Computer Configuration, you should find Administrative Templates, expand it, and click on the Windows Components folder as shown in the image below.
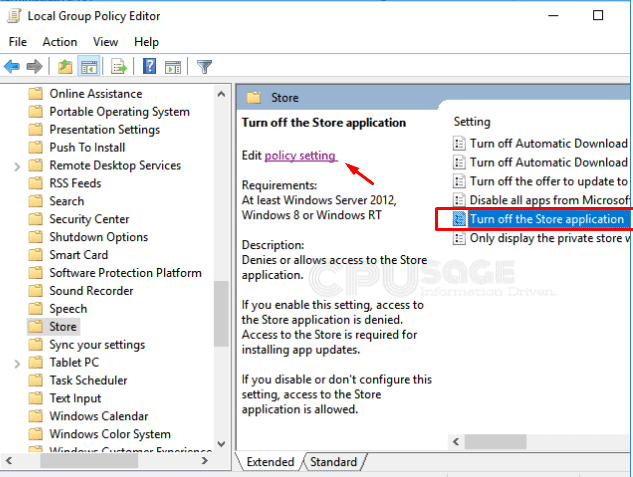
Step 4: Once you click on the Windows Components folder, you should be able to find different sub-folders. Find and double click on the Store from the list.
Step 5: You should now see different settings. Now select the “Turn off the Store application” and click on the “Edit Policy Setting” option that appeared to the left.
Step 6: A dialog box should open up. Check the Enabled option. Now click “Apply” and “OK” to save the settings you made and the dialog box should be closed automatically.
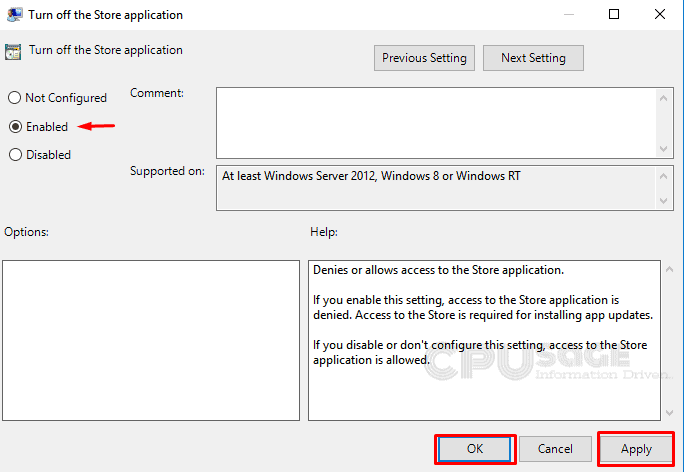
After following the above procedure, make sure you restart your computer to let the changes take effect.
2. Using Registry Editor to disable Windows Store –
Windows Registry is a hierarchical database that contains all of the configurations and settings that are very essential for the proper running of the services, components, applications, and pretty much everything in Windows.
Tinkering with the Registry Editor can be a challenge especially if you are a beginner trying to understand windows stuff. The Registry Editor is meant for experts with enormous knowledge about the components, modules, and services about the Windows operating system. Any false operation may cause serious loss, so it is suggested to be very careful while altering the registry values. This brings us to the solution for the wsappx high disk usage issue.
Step 1: Open Run command box by pressing Windows + R on your keyboard and type in regedit and click on the ok button or press enter.
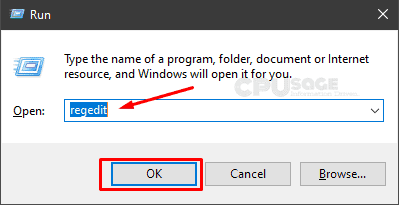
A dialog should appear asking you for administrative permissions. Click on Yes to proceed.
Step 2: This should take you to a new window with a tree in its left pane. Navigate to: HKEY_LOCAL_MACHINE\SOFTWARE\Policies\Microsoft
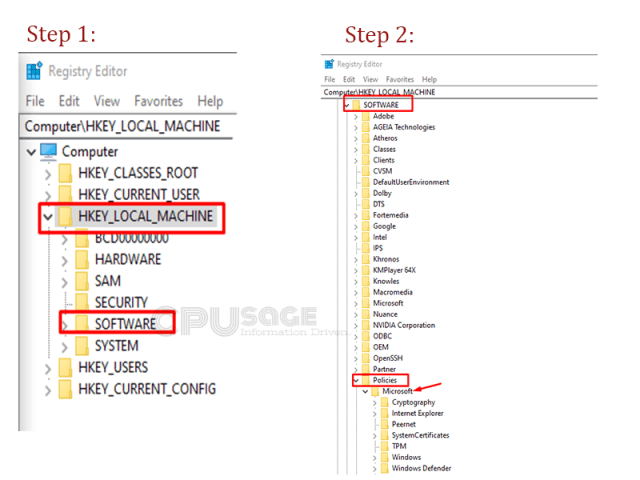
Step 3: Under Microsoft, check for WindowsStore. If you have WindowsStore already listed under Microsoft, skip step 4, and continue with Step 5. If not, create one by going through step 4.
Step 4: Right-click on the Microsoft and choose New then Key and name it WindowsStore.
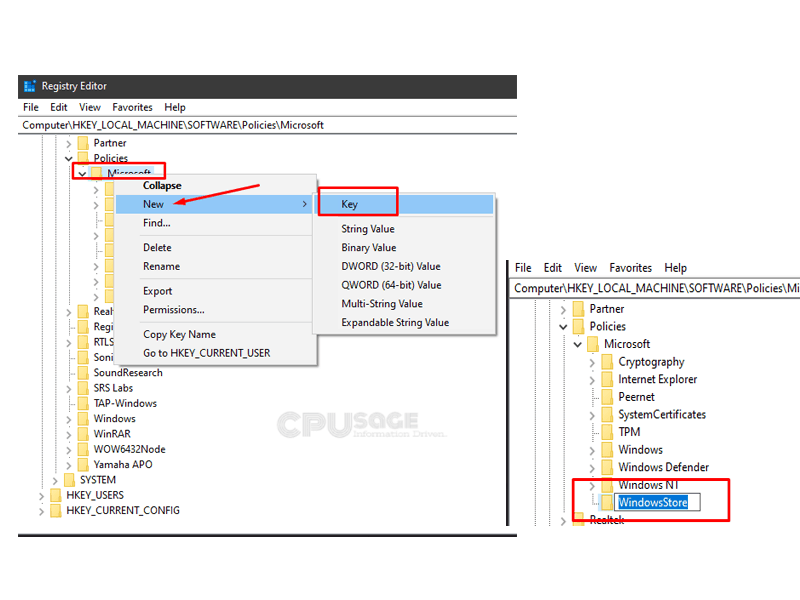
Step 5: Now right-click on the newly created folder (WindowsStore) and select DWORD (32-bit) value.
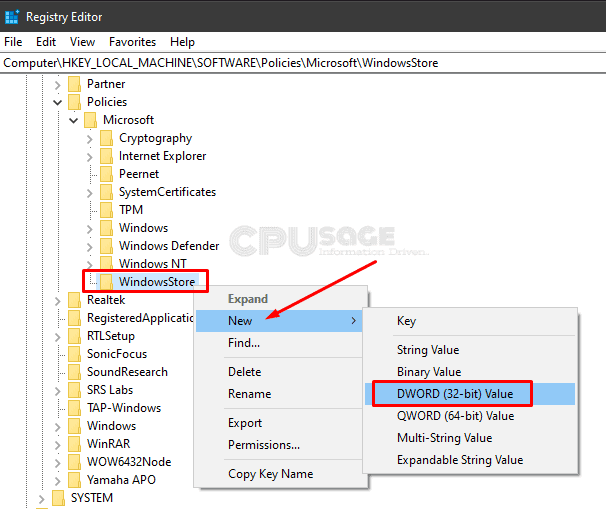
Step 6: Name your DWORD as RemoveWindowsStore. Once you are done, right-click on the RemoveWindowsStore that you just created and select Modify.
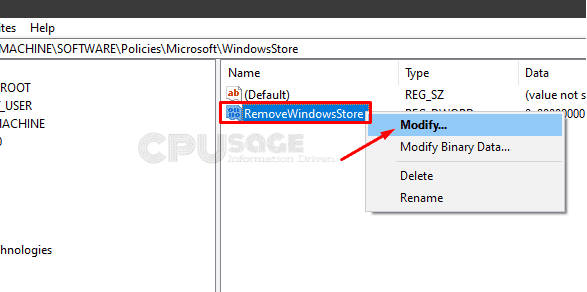
Step 7: Now change the Value data to 1 and click on OK to save.
Restart your computer for the changes to take effect.
FAQs About Fix WSAPPX High Process Utilization on Microsoft Windows 10
The following are some of the questions that we keep hearing a lot from people on different internet forums.
The wsappx is a process related to Windows Store running on both Windows 8 and 10. It includes two separate background services where the AppX Deployment Service (AppXSVC) is common for both Windows 8 and 10. The Client License Service (ClipSVC) on the other hand is a Windows 10 exclusive while Windows Store Service (WSService) can be seen on Windows 8 alone.
The Wsappx high CPU use is due to the background services namely AppX Deployment Service (AppXSVC), Client License Service (ClipSVC), Windows Store Service (WSService). These are the essential services for the smoother running of the Windows Store.
The wsappx high disk use in windows is due to a background service called the AppX Deployment Service (AppXSVC). It is started during the installation, uninstallation, and while updating the apps from Windows Store. This usually causes wsappx high disk use in Windows.